Automate ZAP with Authentication


 Cover photo by @possessedphotography on Unsplash.
The OWASP Zed Attack Proxy (ZAP) can be a powerful tool for pentesters and AppSec testing. However, some of its functionality can be a bit hard to wrap your head around at first. In this post, we will describe how to use one of the more powerful features of the software: Authentication and session management. First, we will show you how to develop an authentication script for a new, previously-unsupported authentication scheme, using the graphical ZAP interface. Afterwards, we will dive into how the same can be achieved inside the secureCodeBox using the newly-supported ZAP Automation Framework.
Why Use Authentication Scripts?
Many web applications and APIs require authentication to expose all of their features. During a manual test of a web application, this can be achieved by logging in to the application by hand - however, when testing APIs, or when using ZAP for regular scans inside the secureCodeBox, manual authentication for each test is no longer feasible. Here, the built-in scripting functionality of ZAP can prove useful. It allows us to authenticate against a server, retrieve a session cookie, JWT, or other authentication marker, and automatically add it to each following request. It can even provide session management to automatically detect if the session has expired and trigger a re-authentication.
In this example, we will be developing and using an authentication script that implements the client credentials flow of OAuth 2.0. In our scenario, the system under test required POSTing three parameters to a URL backed by KeyCloak: the client_id and client_secret, as well as the parameter grant_type=client_credentials.
The ZAP Authentication System
ZAP handles authentication using a combination of multiple mechanisms, configured in different places. This can sometimes be confusing, but in general, there are three major steps to the process: Telling ZAP how it can authenticate to the system (and how to determine if it was successful), giving user account information to ZAP, and ensuring that the session information is actually being used in all requests.
Telling ZAP How to Authenticate
Authentication is always configured for a specific ZAP context. A context is a bundle of one or more domains, which you can define in the context menu.
ZAP already has a number of authentication strategies built-in. They can be configured in the authentication menu of the used context. However, not all possible authentication methods are implemented natively in ZAP. For others, you may have to use an authentication script. The community scripts repository provides an excellent starting point for finding a script that fits your needs. However, in some situations, there may not be a ready-made script for you, and you will have to write your own. In this blog post, we will develop such an authentication script from scratch, explaining the individual components and what they are doing. This is based on our understanding of the system, so, if you find any errors, feel free to point them out by raising an issue in our GitHub repository, and we will be happy to fix it.
For the purpose of this guide, we will assume that you are at least a little familiar with ZAP, and that you have already downloaded and installed the community scripts. If you haven't, you can either download and install the "Community Scripts"-Addon in ZAP, or download the repository and point ZAP at its location in the settings.
Creating A New Script
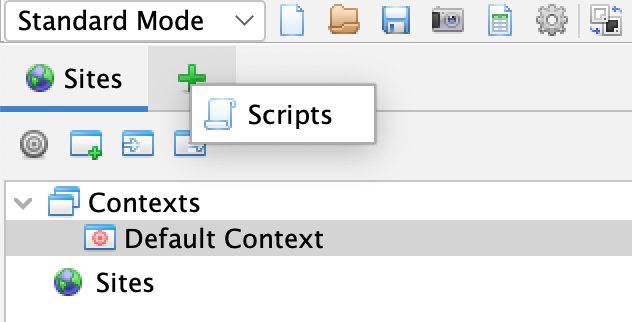
First, you will have to open the ZAP scripting tab (it usually hides behind the green plus-sign, next to the "sites" menu).
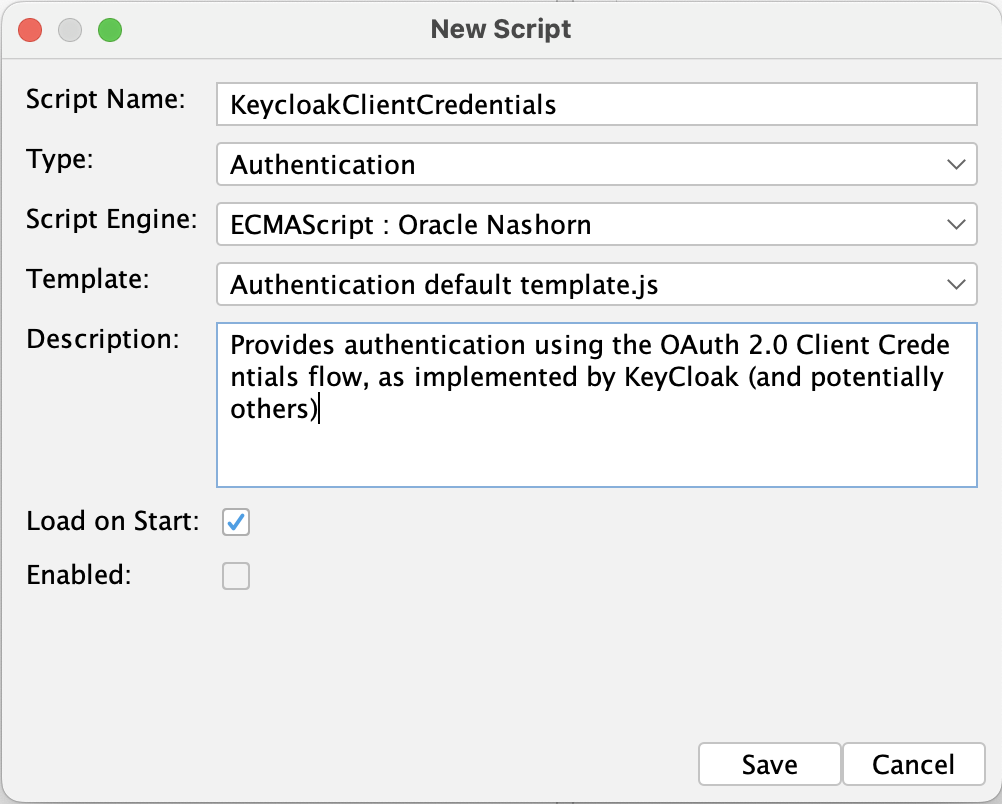
There, create a new script. In this case, we will call it KeycloakClientCredentials.js. Select the script type "Authentication", with the Oracle Nashorn scripting engine, and the "Authentication script.js" template.
You will be presented with a script template that looks something like this:
// The authenticate function will be called for authentications made via ZAP.

// The authenticate function is called whenever ZAP requires to authenticate, for a Context for which this script
// was selected as the Authentication Method. The function should send any messages that are required to do the authentication
// and should return a message with an authenticated response so the calling method.
//
// NOTE: Any message sent in the function should be obtained using the 'helper.prepareMessage()' method.
//
// Parameters:
//		helper - a helper class providing useful methods: prepareMessage(), sendAndReceive(msg), getHttpSender()
//		paramsValues - the values of the parameters configured in the Session Properties -> Authentication panel.
//					The paramsValues is a map, having as keys the parameters names (as returned by the getRequiredParamsNames()
//					and getOptionalParamsNames() functions below)
//		credentials - an object containing the credentials values, as configured in the Session Properties -> Users panel.
//					The credential values can be obtained via calls to the getParam(paramName) method. The param names are the ones
//					returned by the getCredentialsParamsNames() below
function authenticate(helper, paramsValues, credentials) {
	print("Authenticating via JavaScript script...");
	var msg = helper.prepareMessage();

	// TODO: Process message to match the authentication needs

	// Configurations on how the messages are sent/handled:
	// Set to follow redirects when sending messages (default is false).
	// helper.getHttpSender().setFollowRedirect(true)

	// Send message without following redirects (overriding the option previously set).
	// helper.sendAndReceive(msg, false)

	// Set the number of maximum redirects followed to 5 (default is 100). Main purpose is to prevent infinite loops.
	// helper.getHttpSender().setMaxRedirects(5)

	// Allow circular redirects (default is not allow). Circular redirects happen when a request
	// redirects to itself, or when a same request was already accessed in a chain of redirects.
	// helper.getHttpSender().setAllowCircularRedirects(true)

	helper.sendAndReceive(msg);

	return msg;
}

// This function is called during the script loading to obtain a list of the names of the required configuration parameters,
// that will be shown in the Session Properties -> Authentication panel for configuration. They can be used
// to input dynamic data into the script, from the user interface (e.g. a login URL, name of POST parameters etc.)
function getRequiredParamsNames(){
	return ["exampleTargetURL", "exampleField2"];
}

// This function is called during the script loading to obtain a list of the names of the optional configuration parameters,
// that will be shown in the Session Properties -> Authentication panel for configuration. They can be used
// to input dynamic data into the script, from the user interface (e.g. a login URL, name of POST parameters etc.)
function getOptionalParamsNames(){
	return ["exampleField3"];
}

// This function is called during the script loading to obtain a list of the names of the parameters that are required,
// as credentials, for each User configured corresponding to an Authentication using this script
function getCredentialsParamsNames(){
	return ["username", "password"];
}

// This optional function is called during the script loading to obtain the logged in indicator.
// NOTE: although optional this function must be implemented along with the function getLoggedOutIndicator().
//function getLoggedInIndicator() {
//	return "LoggedInIndicator";
//}

// This optional function is called during the script loading to obtain the logged out indicator.
// NOTE: although optional this function must be implemented along with the function getLoggedInIndicator().
//function getLoggedOutIndicator() {
//	return "LoggedOutIndicator";
//}
This is the skeleton for your authentication script. There are four relevant functions: authenticate, getRequiredParamsNames, getOptionalParamsNames and getCredentialsParamsNames. We will begin with the latter three.
Declaring Parameters for the Script
getRequiredParamsNames, getOptionalParamsNames and getCredentialsParamsNames define which parameters the script expects. These functions will usually be quite quick to fill out - our client credentials flow only has a very limited number of relevant parameters we need to pass in. The strings we define here will be used to label elements in the ZAP configuration UI, and also show up again when retrieving the parameters in the authenticate function.
// This function is called during the script loading to obtain a list of the names of the required configuration parameters,
// that will be shown in the Session Properties -> Authentication panel for configuration. They can be used
// to input dynamic data into the script, from the user interface (e.g. a login URL, name of POST parameters etc.)
//
// For the client-credentials flow, only the endpoint to which the authentication message needs to be sent has to be specified.
function getRequiredParamsNames(){
  return ["EndpointForAuthentication"];
}

// This function is called during the script loading to obtain a list of the names of the optional configuration parameters,
// that will be shown in the Session Properties -> Authentication panel for configuration. They can be used
// to input dynamic data into the script, from the user interface (e.g. a login URL, name of POST parameters etc.)
//
// The client credentials flow does not require any optional parameters in our case. If the endpoint implements the optional
// "scope" parameter of the client credentials flow, it could be supported here.
function getOptionalParamsNames(){
  return [];
}

// This function is called during the script loading to obtain a list of the names of the parameters that are required,
// as credentials, for each User configured corresponding to an Authentication using this script.
//
// The client credentials flow requires a client_id and client_secret, equivalent to a username and password.
function getCredentialsParamsNames(){
  return ["client_id", "client_secret"];
}
With this, our script can be parameterized. However, we still need to teach it to perform the actual authentication.
Implementing the Authentication
Now that the parameters are in place, we can implement the actual authentication functionality. In general, the authentication flow will always look something like this:
- Generate an HTTP request with the necessary information for authentication (pulling in script parameters as necessary)
- Send the request and receive the response
- (Repeat as necessary if more than one message is required for authentication)
- Extract the necessary information and store it somewhere where other scripts can use it
Keeping this in mind, a basic implementation of the client credentials flow could look like this:
// ZAP scripts use the protocol defined in JSR 223 (https://www.jcp.org/en/jsr/detail?id=223) to interface with the underlying
// Java code of ZAP. This means that we can access Java objects from within the JavaScript code.
// Here, we import the relevant Java types for later use.
var HttpRequestHeader = Java.type('org.parosproxy.paros.network.HttpRequestHeader');
var HttpHeader = Java.type('org.parosproxy.paros.network.HttpHeader');
var URI = Java.type('org.apache.commons.httpclient.URI');
var ScriptVars = Java.type('org.zaproxy.zap.extension.script.ScriptVars');
// This authentication function implements the client credentials flow from OAuth 2.0.
// It is tested with a Keycloak backend, but should also work for other implementations, assuming
// they return a JWT in their response, inside the access_token attribute of a JSON object.
// If your server behaves differently, change the response parsing below.
//
// The behavior of this function is equivalent to the following curl command:
// curl -X POST -H "Content-Type: application/x-www-form-urlencoded" --data-urlencode "grant_type=client_credentials" --data-urlencode "client_id=<client_id>" --data-urlencode "client_secret=<client_secret>" <tokenendpoint>
//
// NOTE: Any message sent in the function should be obtained using the 'helper.prepareMessage()' method.
//
// Parameters:
// helper - a helper class providing useful methods: prepareMessage(), sendAndReceive(msg), getHttpSender()
// paramsValues - the values of the parameters configured in the Session Properties -> Authentication panel.
// The paramsValues is a map, having as keys the parameters names (as returned by the getRequiredParamsNames()
// and getOptionalParamsNames() functions below)
// credentials - an object containing the credentials values, as configured in the Session Properties -> Users panel.
// The credential values can be obtained via calls to the getParam(paramName) method. The param names are the ones
// returned by the getCredentialsParamsNames() below
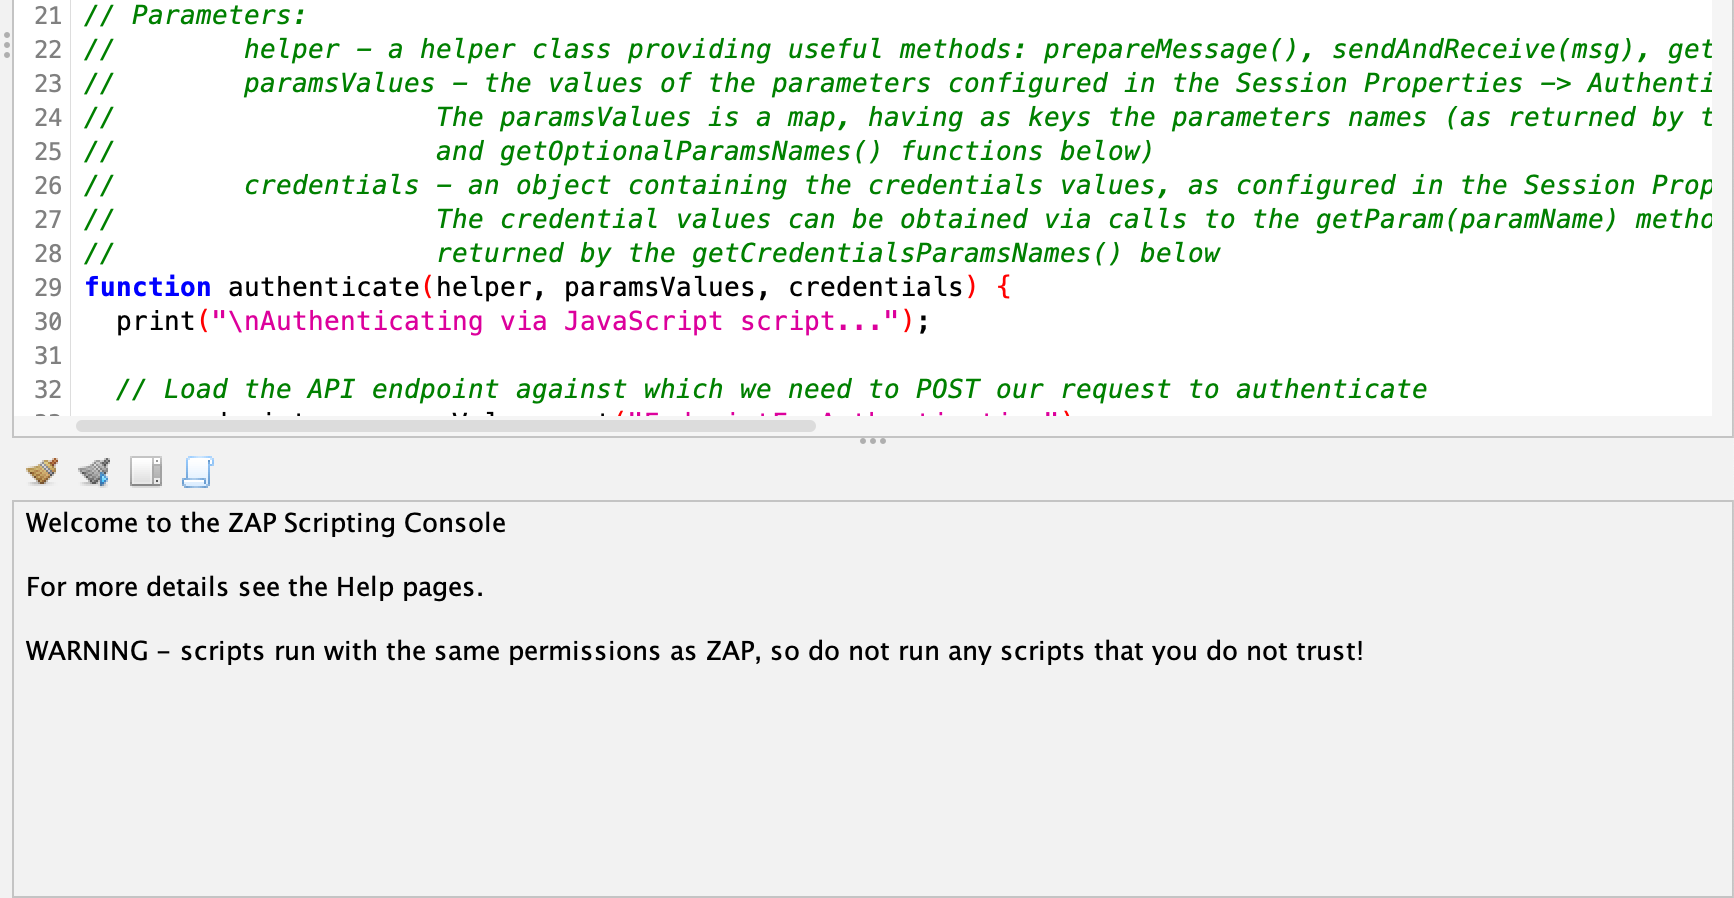
function authenticate(helper, paramsValues, credentials) {
print("\nAuthenticating via JavaScript script...");
// Load the API endpoint against which we need to POST our request to authenticate
var endpoint = paramsValues.get("EndpointForAuthentication");
print("\nAuth endpoint is " + endpoint);
// Create a few Java objects that we will need later
// First, a URI for the endpoint
var requestUri = new URI(endpoint, false);
// Set the request method to POST...
var requestMethod = HttpRequestHeader.POST;
// ...and assemble the necessary requestHeader for the request
var requestHeader = new HttpRequestHeader(requestMethod, requestUri, HttpHeader.HTTP11);
// Prepare a message that we can later send using ZAP...
var msg = helper.prepareMessage();
// ...and set the request headers on it
msg.setRequestHeader(requestHeader);
// Load the client_id and client_secret from the script parameters
var client_id = credentials.getParam("client_id");
var client_secret = credentials.getParam("client_secret")
print("Authenticate with client_id: " + client_id);
// Assemble an OAuth 2.0 Client Credentials POST body, which basically consists of three parts:
// - the grant_type set to client_credentials
// - the client_id parameter and value
// - the client_secret parameter and value
msg.setRequestBody("grant_type=client_credentials&client_id=" + client_id + "&client_secret=" + client_secret);
// Set the correct content length in the message header
msg.getRequestHeader().setContentLength(msg.getRequestBody().length());
// Send the message and receive the response
helper.sendAndReceive(msg);
// Extract the response body as a string
//
// We're going to be pulling out the JWT and saving it into a global variable here.
// This will allow you to simply activate the "addBearerTokenHeader.js" HTTP sender
// script to authenticate all requests you are sending.
//
// If your setup requires more complex handling, you can remove most of the rest of
// this function and instead write a session script - it will get access to the
// message you return from this function, and you can extract the data and do
// things with it from there.
var response = msg.getResponseBody().toString();
// Debug loggin the response
// TURN THIS OFF IF THE TOKEN IS SENSITIVE AND OTHERS MAY READ YOUR LOGS
print("\nResponse is: " + response);
// Parse the embedded JSON that is returned by the server
var json = JSON.parse(response);
// The access token is contained in the returned object under the access_token key
var token = json.access_token;
// Debug statement
// TURN THIS OFF IF THE TOKEN IS SENSITIVE AND OTHERS MAY READ YOUR LOGS
print("\n Endpoint returned token: " + token);
// Save the data to the access_token global variable (which is the one that is read
// by the AddBearerTokenHeader.js script)
ScriptVars.setGlobalVar("access_token", token);
// Return the message, as that is what the API expects us to do.
return msg;
}
Save the resulting file by pressing the save icon at the top of the script explorer (the key combination CTRL+S does not save scripts in ZAP!). With that done, we can now start preparing the rest of ZAP.
Set Up ZAP to Use the Authentication Script
To configure ZAP with authentication, you need to use a ZAP context. A context is basically a bundle of settings that applies to a specific set of URLs. If you start a new ZAP session, it will automatically create an empty, default context for you. It will show up at the top of the "Sites" tree, under "Contexts". If you double-click it, you will be able to change the settings for it. We will need to make adjustments in a few places: the included sites, authentication settings, and the user database.
Included Sites
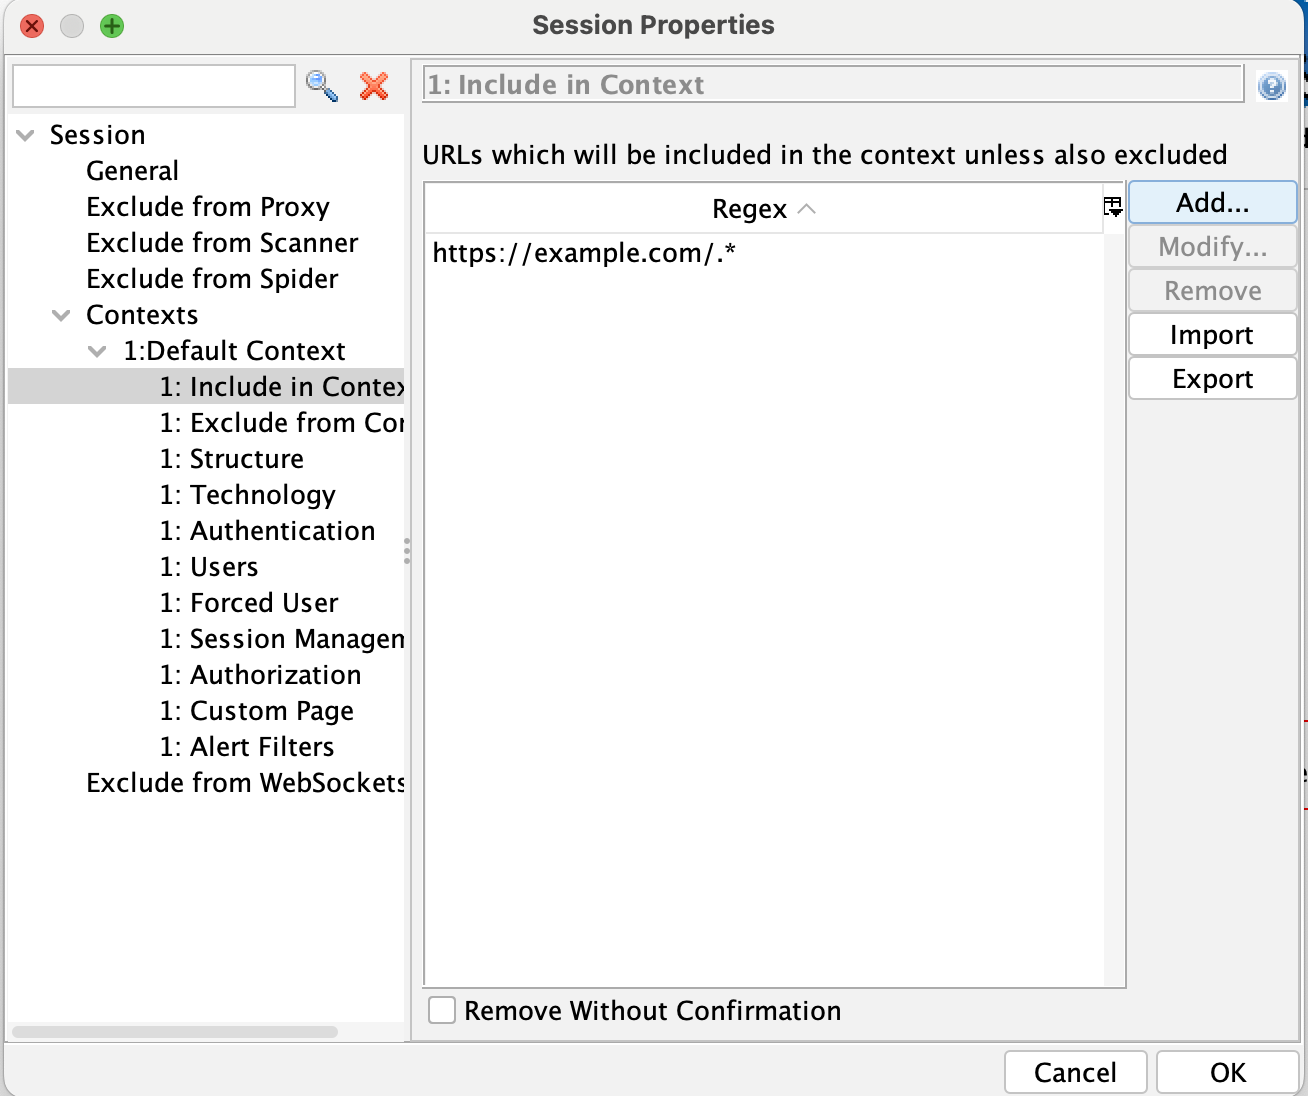
The list of sites included in the context determines which websites it is applied to. To find it, choose the "Include in Context" menu item and add the domain(s) you are testing.
Authentication Settings
Next, we need to tell ZAP about the authentication mechanism that is being used by the website or API. Navigate to the "Authentication" item, and choose "Script-based authentication" in the dropdown menu. Choose the script we just created and click "Load". This will load the script and expose the parameters we defined in the script. Enter the endpoint that is used for authentication in the system under test.
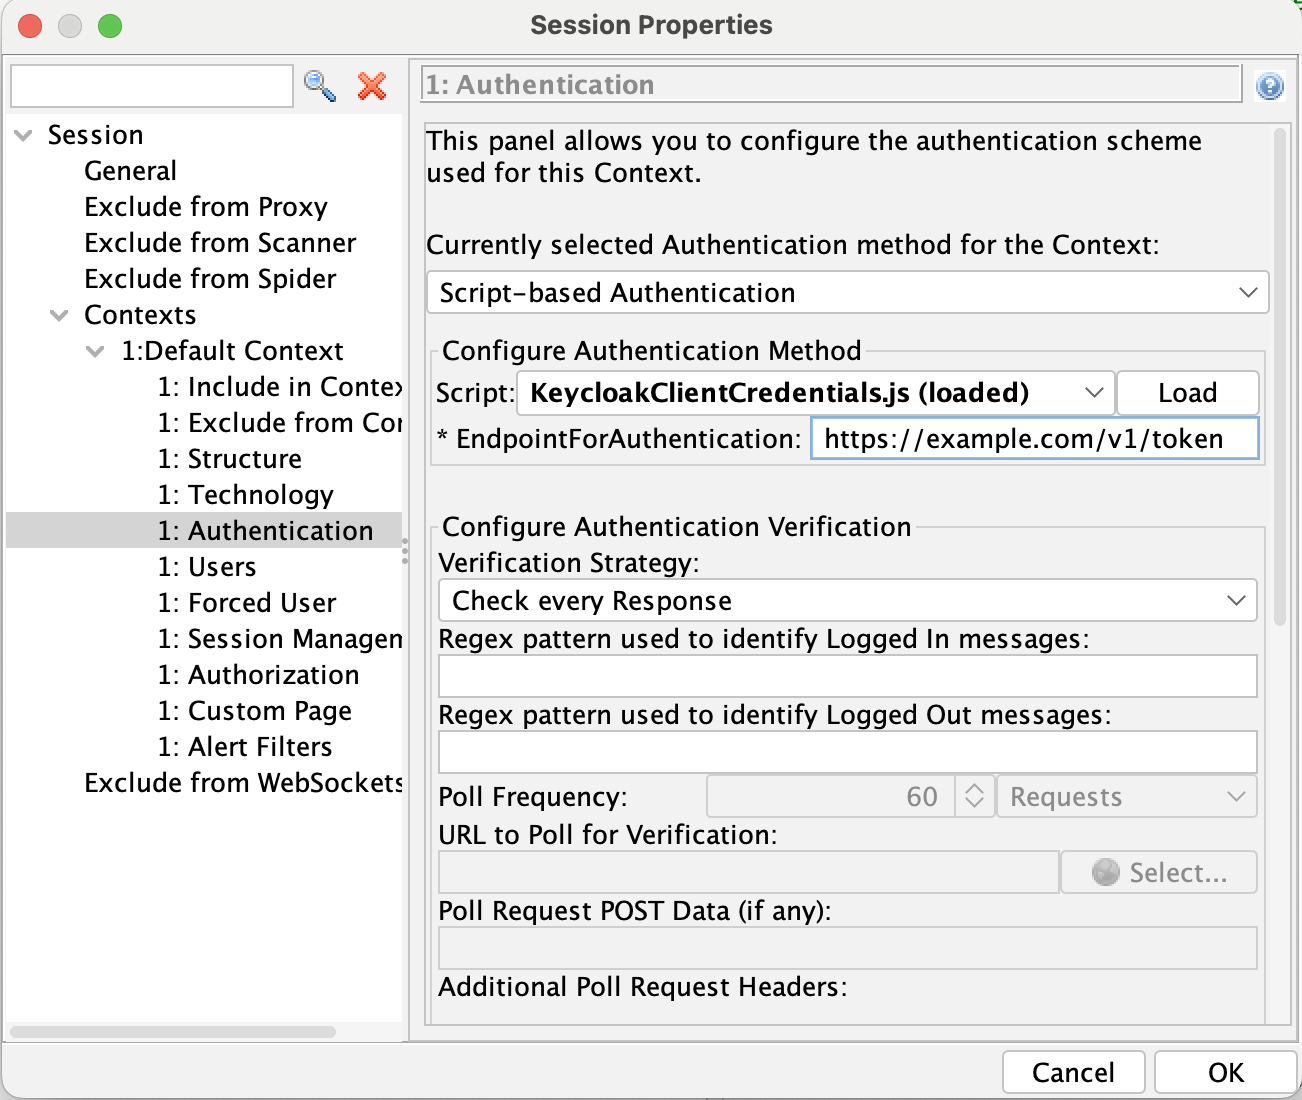
Below that, you will see the session verification settings. These are used by ZAP to determine if the session is still valid. If it turns out that the session is invalid, it will automatically repeat the authentication to obtain a new session. This can happen if you are testing an API that is using short-lived bearer tokens, or if your tests accidentally invalidate your session (for example, because a test navigated to the logout function).
There is no general rule for how you should fill this out - it may be that in your situation, there is a convenient API endpoint that only works while you are logged in, and unequivocally tells you your login status (like loading your user profile). In that case, you can use the "Poll the Specified URL" setting, which will send periodic requests to that endpoint and match a regular expression against the response to figure out if your session is still valid. In other cases, you may be able to use a different verification function. ZAP has some guidance about this in their documentation.
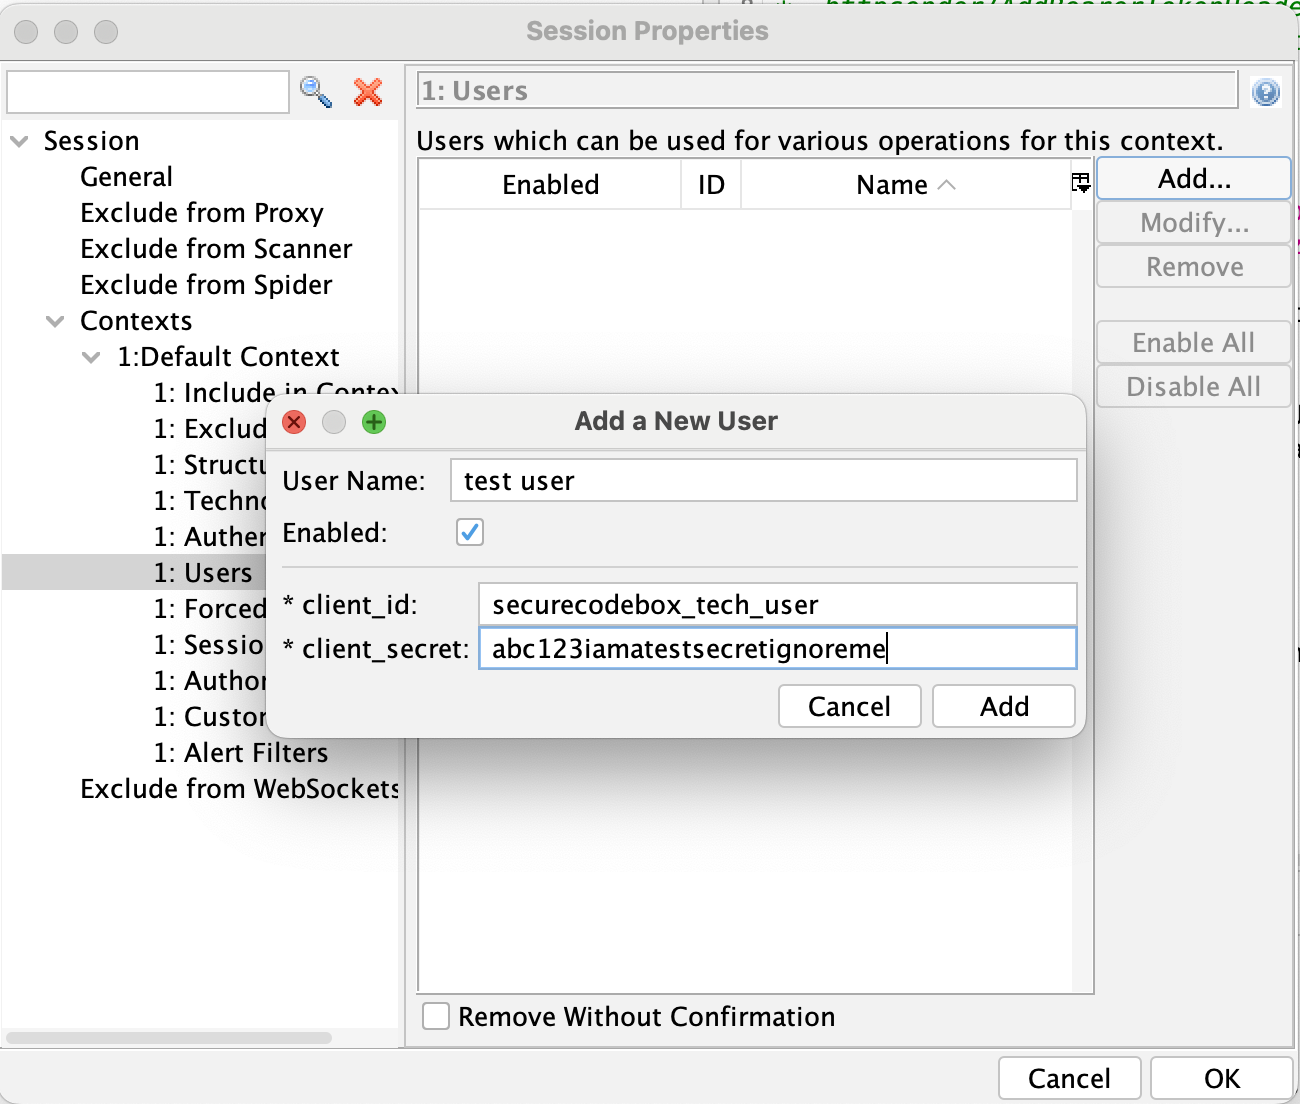
User Database
Next, you need to tell ZAP about the user credentials it should use for authentication. Do so under the "Users" item in the context settings, and click "Add...". You will be prompted for the client_id and client_secret. Give the user a name, enter the details, and save it. Repeat as necessary if you have more than one user you want to use (e.g., when testing an API with role-based access control).
Adding Authentication Information to Requests
The final building block is a way to add the session information to the outgoing requests made by ZAP. For the purpose of this tutorial, we will assume that the system under test expects a JSON Web Token (JWT) in an Authorization header of the form Authorization: Bearer $MY_TOKEN. In that case, you can simply save and close the context settings, navigate back to the script explorer, and find the AddBearerTokenHeader.js script in the "HTTP Sender" category. Right-click the script and select "Enable Script(s)" to turn it on, which will be reflected with a green checkmark next to its icon. This script will pull the authentication token from a global variable called access_token - which is where our authentication script is saving it.
With this, everything should be in place for a test run!
Testing
To test the setup, you need to get ZAP to perform one or more network requests. The easiest way to do this is to use the Spider functionality of ZAP - simply right-click a (sub)page from a site inside the context and trigger a run of the spider. It should automatically use the configured authentication settings. You can then inspect the sent requests and responses as usual in ZAP to check if the bearer token is added correctly, and if the site is accepting or rejecting it.
Debugging
If authentication fails, check the log of the authentication script by going to the scripting tab and selecting the script. Below the window that shows the source code, you can find the logs of the script. This can aid in debugging any issues you may encounter. When updating the script, hitting the save button should be enough to get ZAP to use the updated script (no need to load it again in the context settings).
Forcing ZAP to Use Authentication for Everything
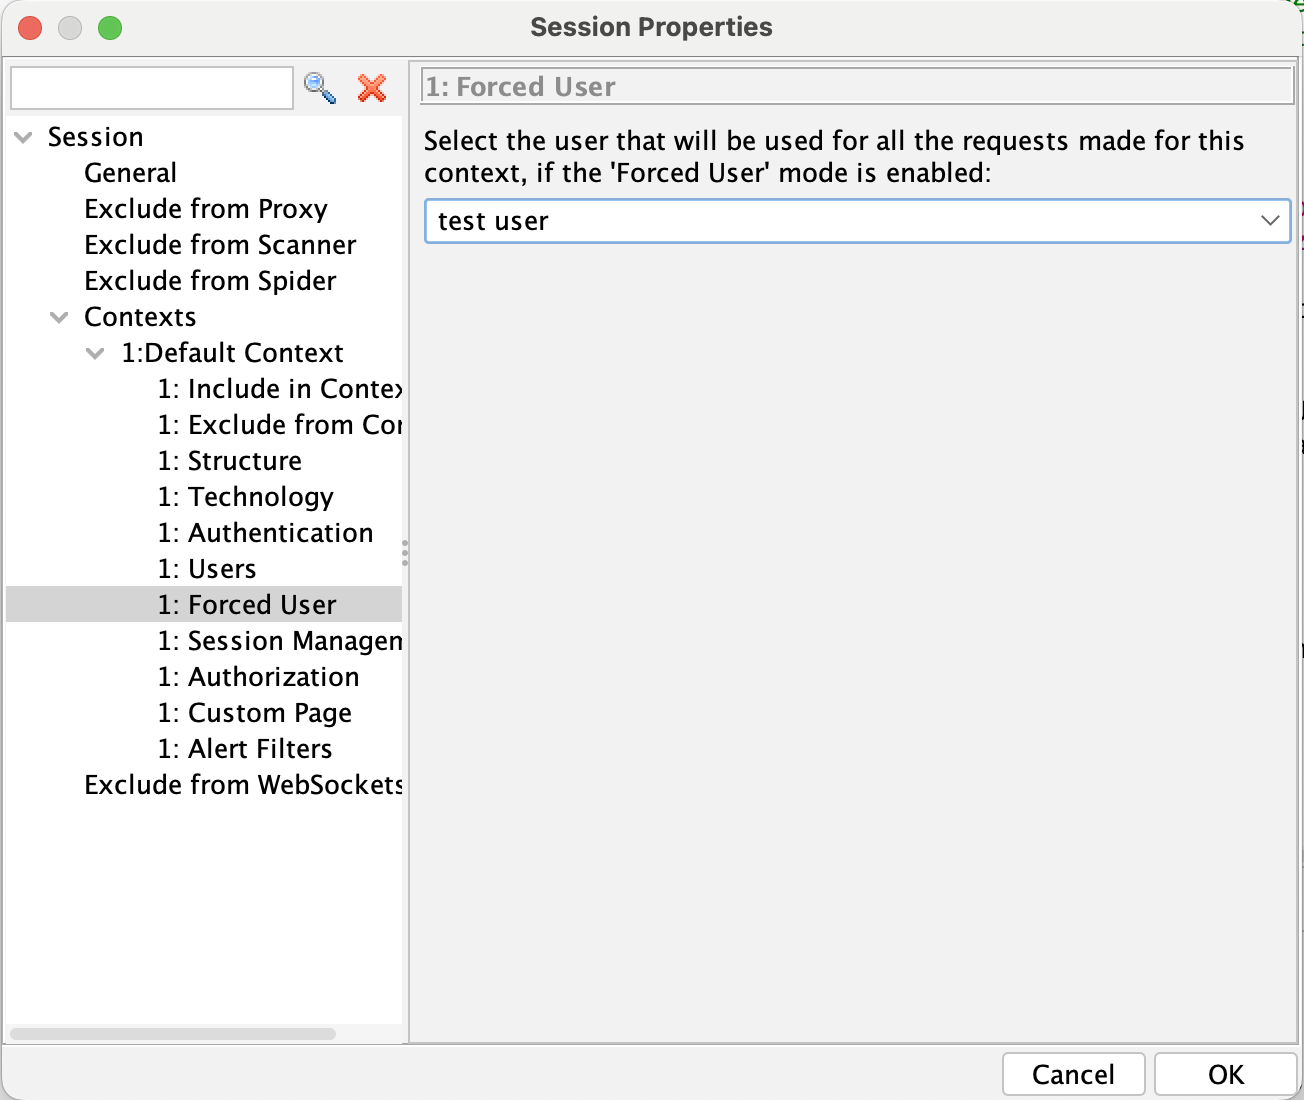
In some situations, ZAP may not be using your authentication settings. In our testing, this seemed to occur most often when using the "Import an OpenAPI Definition from a URL" function. If this happens to you, you can try enabling the "force user mode" under Edit -> Enable Forced User Mode. This will tell ZAP to use the defined user for every request inside the context, no matter what. (NB: ensure that you set your scope correctly - a too-broad scope may result in your authentication token being sent to sites that should not receive it). The user that is used by the "forced user" mode can be configured in the context settings under "forced user", and defaults to the first user you created.
Resending Requests
ZAP will also use the session for requests you send manually, e.g. by using the repeater functionality for a previously-sent request. Regardless of the Authorization header you specify, ZAP will overwrite it with the session of the chosen user (if forced user mode is active). If you get a permission error on the first request, try sending it again - sometimes ZAP first has to create a new session because the old one has expired, and it will not automatically repeat the request in this case.
Using Authentication with the ZAP Automation Framework in the SecureCodeBox
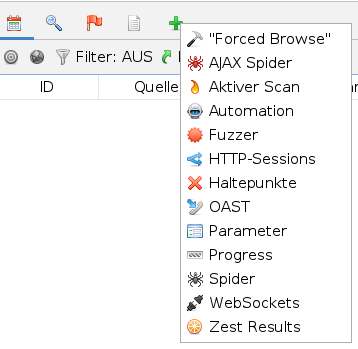
If you followed the guide, you should know how to set up authentication using the ZAP GUI. We now describe how to include authentication in a SecureCodeBox ZAP Automation scan. Adding authentication to your scan is done by modifying the ConfigMap that defines the scan parameters. Fortunately, the ZAP GUI allows for exporting a .yaml file, from which the necessary changes to the ConfigMap can be copied. First, make sure that you have the ZAP Automation Framework Add-On installed in your ZAP GUI. Then, navigate to the Automation tab as shown in the image below.
Here, you press "Save Plan..." to create a .yaml file that includes the necessary configurations for SecureCodeBox to run your authentication script as part of a ZAP Automation scan. Your .yaml file will look similar to this example.
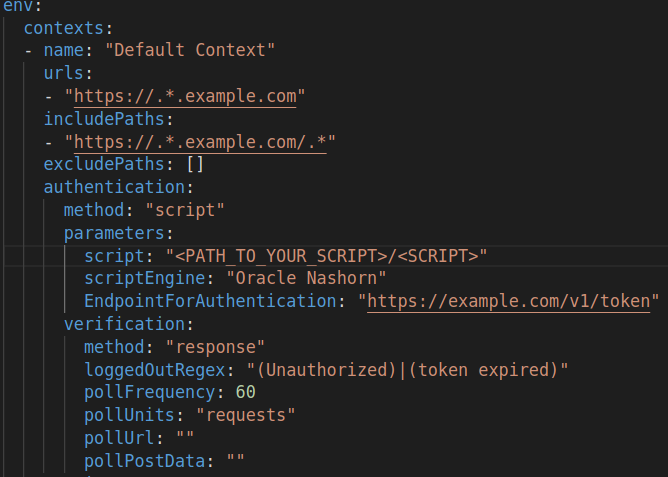
Copy everything under "authentication:" and paste it to the ConfigMap that defines your ZAP Automation scan parameters. Make sure to define the authentication configuration under the correct context and not as a job.
env:
  contexts :
    - name: "context name"
      urls:
      includePaths:
      excludePaths:
      authentication:   # Include your authentication method here
        ...
jobs:
  ...
Additionally to script-based authentication, the ZAP Automation Framework supports manual, HTTP / NTLM, form-based, and JSON-based authentication, which can all be configured for use in a SecureCodeBox ZAP Automation scan.
An example ConfigMap for a ZAP Automation scan may look like this:
apiVersion: v1
kind: ConfigMap
metadata:
  name: "zap-automation-scan-config"
data:
  1-automation.yaml: |-

    env:                                   # The environment, mandatory
      contexts :                           # List of 1 or more contexts, mandatory
        - name: test-config                # Name to be used to refer to this context in other jobs, mandatory
          urls:
          - "https://.*.example.com"
          includePaths:
          - "https://.*.example.com/.*"
          excludePaths: []
          authentication:
            method: "script"
            parameters:
              script: "<PATH_TO_YOUR_SCRIPT_IN_THE_SCB_ENVIRONMENT>/KeycloakClientCredentials.js"
              scriptEngine: "Oracle Nashorn"
              EndpointForAuthentication: "https://example.com/v1/token"
            verification:
              method: "response"
              loggedOutRegex: "(Unauthorized)|(token expired)"
              pollFrequency: 60
              pollUnits: "requests"
              pollUrl: ""
              pollPostData: ""
          sessionManagement:
            method: "cookie"
            parameters: {}
          users:
          - name: "internal-user"
            credentials:
              client_id: "user"
              client_secret: "pass"
      parameters:
        failOnError: true                  # If set exit on an error
        failOnWarning: false               # If set exit on a warning
        progressToStdout: true             # If set will write job progress to stdout

    jobs:
      - type: addOns                       # Add-on management
        install: [pscanrulesAlpha, pscanrulesBeta] # A list of non standard add-ons to install from the ZAP Marketplace
      - type: passiveScan-config           # Passive scan configuration
        parameters:
          maxAlertsPerRule: 10             # Int: Maximum number of alerts to raise per rule
          scanOnlyInScope: true            # Bool: Only scan URLs in scope (recommended)
      - type: spider                       # The traditional spider - fast but doesnt handle modern apps so well
        parameters:
          context: test-config             # String: Name of the context to spider, default: first context
          user: internal-user              # String: An optional user to use for authentication, must be defined in the env
          maxDuration: 2                   # Int: The max time in minutes the spider will be allowed to run for, default: 0 unlimited
      - type: spiderAjax                   # The ajax spider - slower than the spider but handles modern apps well
        parameters:
          context: test-config             # String: Name of the context to spider, default: first context
          maxDuration: 2                   # Int: The max time in minutes the ajax spider will be allowed to run for, default: 0 unlimited
      - type: passiveScan-wait             # Passive scan wait for the passive scanner to finish
        parameters:
          maxDuration: 10                  # Int: The max time to wait for the passive scanner, default: 0 unlimited
      - type: report                       # Report generation
        parameters:
          template: traditional-xml        # String: The template id, default : modern
          reportDir: /home/securecodebox/  # String: The directory into which the report will be written
          reportFile: zap-results          # String: The report file name pattern, default: {{yyyy-MM-dd}}-ZAP-Report-[[site]]
        risks:                             # List: The risks to include in this report, default all
          - high
          - medium
          - low
For a complete overview of all the possible options you have for configuring a ZAP Automation scan, run
bash ./zap.sh -cmd -autogenmax zap.yaml . Alternatively, have a look at the official documentation.
Credentials in ZAP Automation
The ZAP Automation Scanner supports the use of secrets, as to not have hardcoded credentials in the scan definition. Generate secrets using the credentials that will later be used in the scan for authentication:
kubectl create secret generic unamesecret --from-literal='username=<USERNAME>'
kubectl create secret generic pwordsecret --from-literal='password=<PASSWORD>'
You can now include the secrets in the scan definition and reference them in the ConfigMap that defines the scan options.
The following defines two secrets for the use in JSON-based authentication. The secrets can be referenced in the ConfigMap via ${EMAIL} and ${PASS}.
apiVersion: "execution.securecodebox.io/v1"
kind: Scan
metadata:
  name: "zap-example-scan"
spec:
  scanType: "zap-automation-scan"
  parameters:
    - "-host"
    - "http://juiceshop.demo-targets.svc"
    - "-autorun"
    - "/home/securecodebox/scb-automation/2-automation.yaml"
  volumeMounts:
    - mountPath: /home/securecodebox/scb-automation/2-automation.yaml
      name: zap-automation
      subPath: 2-automation.yaml
  volumes:
    - name: zap-automation
      configMap:
        name: zap-automation-scan-config
  env:
    - name: EMAIL
      valueFrom:
        secretKeyRef:
          name: unamesecret
          key: username
    - name: PASS
      valueFrom:
        secretKeyRef:
          name: pwordsecret
          key: password
Conclusion
With this, you should have everything you need to use a custom authentication script with ZAP in the secureCodeBox. Done right, scripting can become an indispensible part of your workflows for automated security scans, and enable you to gain a significantly improved scan coverage for applications that require authentication. To get you started, the ZAP Community Scripts repository contains a wide variety of scripts for different purposes, which illustrate the different ways scripting can be used, and which can serve as a template for your own scripting. We can't wait to see what you will do with the combined power of ZAP scripting and the secureCodeBox!