Storing Findings with Persistence Hooks
Introduction
Let's say you need to manage a cluster of potential security risks, such as a large number of websites or your company's internal network. Your needs will exceed the limitations of manual findings handling or our build-in minio instance quite soon. The solution comes with a so-called persistence provider, which allows you to not only store your findings over a long period of time (as the name suggests), but also classify, prioritize and analyze them. This tutorial discusses two persistence providers, DefectDojo and ElasticSearch, which can both be combined with the secureCodeBox.
Side-note: The tutorials are scanning scanme.nmap.org, which is a public service provided by nmap. It is meant to be used for port-scanning examples, but should not be abused with too much scanning per day. If you know that your local machine is providing meaningful findings as well, consider using localhost as target for all scans. We chose to use scanme.nmap.org in the tutorial however, because of reproducibility for most users.
Pre-Requirements
All setups have been tested with Ubuntu 22.04 and Kubernetes 1.24
Make sure you have the following tools available on your system before starting:
DefectDojo
DefectDojo is a widespread platform for vulnerability management and security orchestration. The secureCodeBox provides a hook that allows to directly connect the SCB to a local or remote DefectDojo instance. In this tutorial, we will at first guide you through a step-by-step setup manual. Afterward, you will learn about some features of DefectDojo and how to use them in conjunction with the secureCodeBox.
We will now at first set up an instance of DefectDojo in a local minikube cluster. After we have that running, we install the secureCodeBox and the DefectDojo hook.
DefectDojo Kubernetes setup
(General, more detailed instructions can be found here)
At the moment DefectDojo does not provide a Docker image for arm64. As a workaround you can run a local instance of DefectDojo (see Troubleshooting).
Using minikube (for kind clusters see instructions below):
# Download DefectDojo repo
git clone https://github.com/DefectDojo/django-DefectDojo
cd django-DefectDojo

# Start the cluster
minikube start
minikube addons enable ingress

# Get helm charts (bitnami necessary for Helm >= v3)
helm repo add bitnami https://charts.bitnami.com/bitnami
helm repo update
helm dependency update ./helm/defectdojo

# Install DefectDojo helm chart
helm upgrade --install \
  defectdojo \
  ./helm/defectdojo \
  --set django.ingress.enabled=true \
  --set django.ingress.activateTLS=false \
  --set createSecret=true \
  --set createRabbitMqSecret=true \
  --set createRedisSecret=true \
  --set createMysqlSecret=true \
  --set createPostgresqlSecret=true \
  --set host="defectdojo.default.minikube.local" \
  --set "alternativeHosts={localhost,defectdojo.default.minikube.local:8080,defectdojo-django.default.svc}"
Using kind:
git clone https://github.com/DefectDojo/django-DefectDojo
cd django-DefectDojo

kind create cluster

helm repo add bitnami https://charts.bitnami.com/bitnami
helm repo update
helm dependency update ./helm/defectdojo

helm upgrade --install \
  defectdojo \
  ./helm/defectdojo \
  --set django.ingress.enabled=true \
  --set django.ingress.activateTLS=false \
  --set createSecret=true \
  --set createRabbitMqSecret=true \
  --set createRedisSecret=true \
  --set createMysqlSecret=true \
  --set createPostgresqlSecret=true \
  --set host="defectdojo.default.kind.local" \
  --set "alternativeHosts={localhost,defectdojo.default.kind.local:8080,defectdojo-django.default.svc}"
After a while, you should see that all pods are running:
kubectl get pods
To access DefectDojo locally, you probably need to add the following lines to /etc/hosts:
# Minikube
::1       defectdojo.default.minikube.local
127.0.0.1 defectdojo.default.minikube.local
# Kind
::1       defectdojo.default.kind.local
127.0.0.1 defectdojo.default.kind.local
Now, retrieve the admin password:
echo "DefectDojo admin password: $(kubectl \
      get secret defectdojo \
      --namespace=default \
      --output jsonpath='{.data.DD_ADMIN_PASSWORD}' \
      | base64 --decode)"
After that, we can port-forward the DefectDojo service and thereby verify that the installation was successful:
kubectl port-forward --namespace=default service/defectdojo-django 8080:80
We are finally ready to access our DefectDojo instance! In your browser, switch to
defectdojo.default.minikube.local:8080 or
defectdojo.default.kind.local:8080.
You should see the DefectDojo login mask.
Enter admin as username and type the password that you received in the step before.
Once logged in, you need to get your API v2 Key. Click on the person symbol in the upper-right corner and choose
API v2 Key. There should be a line like Your current API key is abcdef123456789.... Save it for later.
secureCodeBox setup
(General setup instructions can be found here)
At first, we install the operator and a scanner:
# Install the operator
helm repo add secureCodeBox https://charts.securecodebox.io
kubectl create namespace securecodebox-system
helm --namespace securecodebox-system upgrade --install securecodebox-operator secureCodeBox/operator

# Create a namespace for scanning - makes it easier to read logs if something went wrong
kubectl create namespace scanning
# Install nmap scanner for the later tutorial steps
helm upgrade --namespace scanning --install nmap secureCodeBox/nmap
To install the DefectDojo hook, we need to create a secret with the API v2 Key we retrieved before:
kubectl create secret generic defectdojo-credentials -n scanning \
  --from-literal="username=admin" --from-literal="apikey=<APIv2KEY>"
Finally, we can install the DefectDojo hook via helm:
helm upgrade --namespace scanning --install dd secureCodeBox/persistence-defectdojo
To verify that everything works, we now start an nmap scan and check that its results are uploaded to our DefectDojo instance. Create the following file:
# scan.yaml
# SPDX-FileCopyrightText: the secureCodeBox authors
#
# SPDX-License-Identifier: Apache-2.0

apiVersion: "execution.securecodebox.io/v1"
kind: Scan
metadata:
  name: "nmap-scanme.nmap.org"
spec:
  scanType: "nmap"
  parameters:
    - scanme.nmap.org
We then apply it via:
kubectl apply -n scanning -f scan.yaml
If everything was set up correctly, you should see an nmap-scanme.nmap.org engagement in the DefectDojo engagements dashboard after a while. If you experience any problems, you may find advice in the troubleshooting section at the end.
Managing findings via the secureCodeBox and DefectDojo
To give you an idea of what a workflow with the secureCodeBox and DefectDojo might look like, we will take a glance at DefectDojo's findings de-duplication ability. When scanning the same target multiple times, e.g. with a scheduled scan, we do not want to get notified about findings that are duplicates of already existing ones. DefectDojo handles this for us, let us try it out:
-
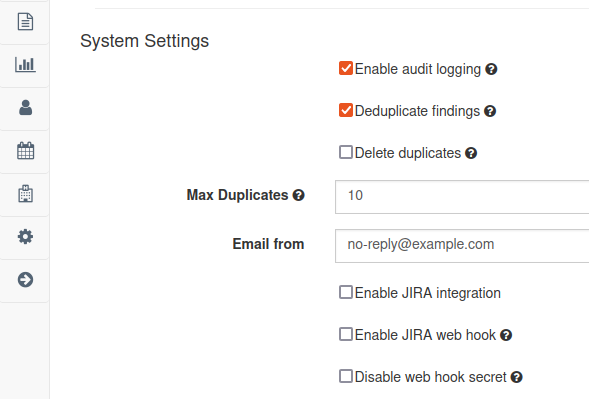
At first, make sure to activate De-Duplication in DefectDojo: In your DefectDojo instance, click on the settings symbol in the menu bar at the left. Select Systems Settings. Next, tick the checkbox next to Deduplicate findings.
-
Let us now verify that if we run an identical scan again, the amount of active findings does not change.
Delete the scan from before in kubernetes. Note that this does not affect DefectDojo.
kubectl delete scan nmap-scanme.nmap.org -n scanning
Re-apply it via kubectl:
kubectl apply -f scan.yaml -n scanning
After scan and DefectDojo hook have finished, check again your local DefectDojo instance. There should not be any new Active Findings. You can still find the duplicates under Findings -> View All Findings.
Advanced use-case: Hook annotations
It is possible to overwrite the default values that the DefectDojo hook uses to create products and engagements. This is especially handy when using the secureCodeBox Autodiscovery or CascadingScans to annotate your scans with useful names and to keep track of their origin. For the Autodiscovery, there are already pre-defined values that can be found here.
To get you started with a simple example, we will now create an annotation in a manually executed scan. Create the following file:
# scanAnnotation.yaml
# SPDX-FileCopyrightText: the secureCodeBox authors
#
# SPDX-License-Identifier: Apache-2.0

apiVersion: "execution.securecodebox.io/v1"
kind: Scan
metadata:
  name: "nmap-scanme.nmap.org-annotation"
  annotations:
    defectdojo.securecodebox.io/product-name: "Annotation Example"
spec:
  scanType: "nmap"
  parameters:
    - scanme.nmap.org
Execute it via kubectl:
kubectl apply -n scanning -f scanAnnotation.yaml
After a while you should see a new engagement in your DefectDojo instance with product name Annotation Example.
ElasticSearch
ElasticSearch enables users to store and search pretty much any possible kind of data. Kibana provides a graphical user interface to easily access the data stored in ElasticSearch. Using them in combination with the secureCodeBox is simpler than using DefectDojo, as the persistence-elastic hook comes with a ready-to-use ElasticSearch and Kibana instance.
Setup
At first, we create a cluster and the secureCodeBox namespace and operator:
minikube start

kubectl create namespace securecodebox-system
helm --namespace securecodebox-system upgrade --install securecodebox-operator secureCodeBox/operator
Next, we simply install an exemplary scanner and the persistence-elastic hook. Note that Kibana is enabled by default.
# Scanner and ElasticSearch should be in the same namespace
kubectl create namespace elastic
helm --namespace elastic upgrade --install nmap secureCodeBox/nmap
helm --namespace elastic upgrade --install persistence-elastic secureCodeBox/persistence-elastic
That's it! Let us run an example scan (same as above for DefectDojo):
# scan.yaml
# SPDX-FileCopyrightText: the secureCodeBox authors
#
# SPDX-License-Identifier: Apache-2.0

apiVersion: "execution.securecodebox.io/v1"
kind: Scan
metadata:
  name: "nmap-scanme.nmap.org"
spec:
  scanType: "nmap"
  parameters:
    - scanme.nmap.org
Apply it via kubectl:
kubectl apply -n elastic -f scan.yaml
After the scan has finished, you can view the findings in Kibana. Create a port-forward:
kubectl port-forward -n elastic services/persistence-elastic-kibana 5601:5601
You can now go to localhost:5601 and access your data in the Kibana instance!
Managing findings via the secureCodeBox and Kibana
Note that unlike DefectDojo, ElasticSearch does not automatically handle duplicated findings. However, you can find pre-defined dashboards for some scanners implemented in the secureCodeBox, which makes visualizing their results straightforward. You can find a list of all available dashboards under /app/dashboards#/list in your local Kibana instance.
Using DefectDojo and ElasticSearch simultaneously
It is possible to use DefectDojo and ElasticSearch at the same time. Note that DefectDojo overwrites the findings of the SCB with its own format by default. So when using multiple persistence providers, hook execution order does matter. The problem can be solved in two ways: Either use the hook order functionality or set DefectDojo to read-only mode.
Troubleshooting
Troubleshooting
Connecting the SCB to a persistence provider, especially DefectDojo, can sometimes be a bit tricky. The following tips might help in case that something went wrong:
-
Waiting: It takes some time for the DefectDojo or Kibana instance to come up. You might also have to refresh several times in order to connect to localhost after the port-forward.
-
Verbose logging: You can view verbose output for everything in your cluster, for example via stern. For the following steps, you have to have krew installed:
kubectl krew install stern
# View all logs in default namespace:
kubectl stern .*
# View for a specific namespace
kubectl stern .* --namespace scanning -
Re-Installation of DefectDojo: Note that if anything went wrong, and you have to re-install DefectDojo in the cluster, the createSecret flags in the values.yaml file of DefectDojo must not be set. You can find more details here.
-
Server error in DefectDojo: Make sure that all pods are running. If you are continuing to experience errors after a re-installation, consider using a different cluster manager (e.g., kind instead of minikube).
-
Using a local instance of DefectDojo rather than Kubernetes: If nothing helps, you still have the option to run DefectDojo outside your cluster (instructions here). After that, you can connect the DefectDojo hook treating it like a remote instance of DefectDojo. The helm install command for the hook would look like this:
# $YOURLOCALIP should look something like http://192.168.2.242:8080
helm upgrade --install persistence-defectdojo secureCodeBox/persistence-defectdojo \
--set="defectdojo.url=$YOURLOCALIP" -
Increasing cluster resources: Running a lot of pods at the same time can be resource-intensive. If you find that your persistence providers are not reacting in appropriate time, you might want to increase the number of CPUs and memory usage for your minikube cluster:
# If you already created a cluster, you most likely have to delete it at first
minikube stop
minikube delete
# Create a new cluster with more resources
minikube start --memory 8192 --cpus 4